Guitar Building

Day 13 – Headstock & Fretboard Inlay

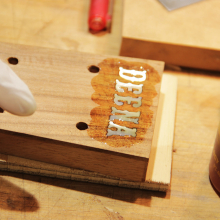
  I had left the rabbit inlay to dry the previous workshop day so I got to take off the clamps and sand it down. After sanding it down, I saw that there were quite a few holes that were cheeky enough to escape the pressure so I had to fill them back up with […]

Read More...

Day 11 – Inlay Work & Checking Out

Spent most of the day routing out the channel for my inlays to sit in. That was a fidgety process – you had to be careful not to take out too much, otherwise you’ll see the gaps that were being filled by the epoxy. Obviously, being handmade and not using a CNC machine does mean […]

Read More...

Day 9 – Back & Top Bracing

Day 9 was all about making the bracing, trimming off the excess lengths and chiseling out the check out points in the kerfing for the bracing to fit within the sides. As the back bracing was all ready and glued on, all I needed to do was trim off the excess lengths that were actually […]

Read More...

Day 8 – Side Prepping & Putting in the Rosette Inlay

The sides were placed into the jig ready for me to plane down evenly so that the back can be put on. When we made the sides we left quite a bit of leeway in case of any measurement mishaps. This was Tor’s amazing inlay work. He is sanding down the fretboard to get the […]

Read More...

Day 7 – Trimming Headstock, Front Bracing, Choosing Accessories

I didn’t really maximise my day as I had decision making issues haha. Took me forever to decide what I wanted so that I could then progress. Above was the rosettes I narrowed down to – I ended up asking you guys for a lot of help throughout the day and it was amazing. Everyone’s […]

Read More...

Day 6 – Bending Cutaways, Gluing Back Bracings

I had to skip a day at the workshop due to Teneriffe Festival, but Tor is zooming way beyond me. He’s doing something a little bit different though. Hancock Guitars offers two types of courses – making a guitar out of a kit so essentially learning how to put all the parts together and a […]

Read More...

Day 5 – Sanding Forever & Ever

I spent the day sanding. And I mean the whole day. It was important to first get both sides rid of glue and any non-stick paper that were left on from the gluing process and then to buff out any imperfections, rough edges or water marks. After that was completed it was time to get […]

Read More...

Day 4 – Bending Sides and Cutting Top & Back

Today I got to start bending my sides. First I sanded off the edges so that both sides were even and then we sprayed them with water. We put them into the bending machine to warm up with the heat lamps (they sit under the metal plate) for 10 minutes and then quarter turned the […]

Read More...

Day 3 – Sides & Headstock Veneer

We got the bending machine down from collecting dust on a shelf. Sean took off the cover to show us what bends the wood. I couldn’t believe it – just some modest heat lamps. I had a lovely day today. It’s been so long since I made the time to do nothing but one thing […]

Read More...